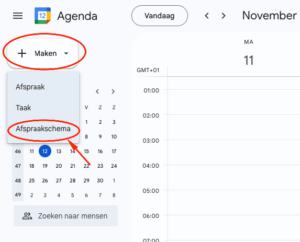
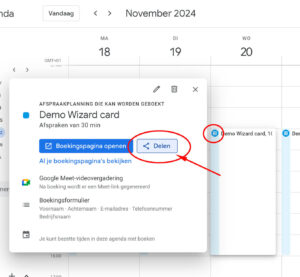
Go back

Add Google appointment scheduling to your business card

Adding a Google Calendar appointment scheduler to your digital business card makes it easy for contacts to instantly schedule an appointment with you. In this article, we’ll explain how you can do this easily.

1. Create an appointment schedule in Google Calendar:

  1. Open Google Calendar and click on “Create”.
  2. Select “Appointment schedule”.
Google afspraakschema maken
  1. Enter a title for your appointment schedule, for example, “Meeting with [Your Name]”.
  2. Set your availability by selecting the days and times you want to offer appointments.
  3. Adjust the duration of the appointments if desired.
  4. Click “Save” to create your appointment schedule.
Google agenda afspraakschema

2. Share your appointment schedule:

  1. In Google Calendar, click on the appointment schedule you just created.
  2. Select “Share”.
  3. Copy the displayed link — this is the URL to your booking page.
Google agenda delen

3. Add the appointment scheduler to your digital business card:

  1. Log in to the Card Manager.
  2. Select the business card to which you want to add the scheduler.
  3. Add a new field.
  4. Select the field type “Extra link.”
  5. Paste the previously copied URL into the Link field.
  6. In the text field, enter a label such as “Schedule an appointment.”
  7. Add an icon if desired (learn how here).
  8. Save your changes and publish your updated business card.
afspraak toevoegen aan visitekaartje

Your own digital
visitekaartje

  • Delivered within 2 days
  • Your own design
  • Excellently rated